Showing posts with label recipe. Show all posts

Friday, March 1, 2013

Starbucks Pumpkin Scones Recipe

I made these today and they were FANTASTIC. If you like Starbuck's Pumpkin Scones, you will love this recipe.
Truth be told, these are so easy, my kids make them without me.
Another truth. I ate three of them by myself.
They're dangerous.
You've been warned.
Starbucks Pumpkin Scones
Recipe adapted from Food.com
SCONES:
2 cups all-purpose flour
7 tablespoons sugar
1 tablespoon baking powder
1/2 teaspoon salt
1/2 teaspoon ground cinnamon
1/2 teaspoon ground nutmeg
1/4 teaspoon ground cloves
1/4 teaspoon ground ginger
6 tablespoons cold butter
1/2 cup canned pumpkin
3 tablespoons half-and-half (I used evaporated milk, because I had it, but non-fat milk works fine)
1 large egg

 POWDERED SUGAR GLAZE (painted on)
1 cup powdered sugar
1 tablespoon powdered sugar
2 tablespoons whole milk (I used evaporated milk)

 SPICED GLAZE (the drizzle)
1 cup powdered sugar
3 tablespoons powdered sugar
1/4 teaspoon ground cinnamon
1/8 teaspoon ground nutmeg
1 pinch ginger
1 pinch ground cloves 
Orange food coloring if you want the darker, pumpkin-y color 

Directions:

Preheat oven to 425 degrees F. Line cookie sheet with parchment paper.
Combine flour, sugar, baking powder, salt, and spices in a large bowl. Cut butter into the dry ingredients until mixture is crumbly. Set aside.

In a separate bowl, whisk together pumpkin, half and half or canned milk, and egg. Fold wet ingredients into dry ingredients. Form the dough into a ball.

Pat out dough onto a lightly floured surface and form it into a 1-inch thick rectangle (about 9 inches long and 3 inches wide). Use a large knife or a pizza cutter to slice the dough twice through the width, making three equal portions. Cut those three slices diagonally so that you have 6 triangular slices of dough.

Place on prepared baking sheet. Bake at 425 for 14-16 minutes. Scones should be a light brown. Cool on wire rack.

PLAIN GLAZE:
Mix powdered sugar and 2 T canned milk til smooth. When scones cool, brush on glaze to cover tops and sides.

SPICED ICING:
This gives your scones a little extra kick, and looks neat, so don't leave it out.
Combine all ingredients for spiced glaze. Add orange food coloring, a tiny bit at a time, til you get your desired color.

Drizzle icing over scone. You can do this off the end of a spoon, or make your own decorator bag by placing the glaze in a small baggie and snipping the corner off the bag.

Wednesday, September 26, 2012

Navajo Tacos / AKA Almost Copycat Taco Bell Chalupas

Have you ever tried Taco Bell's chalupas? I know it's probably uncool, but I have to confess that I love 'em. That's why they're here in the 30 Days of Family Favorite Recipes.

These babies, Navajo Tacos, remind me of them. They're a special treat and we don't have them often, but when we do....ahhhh....bliss!

They're pretty simple to make - so simple in fact, that my kids can make them, and often do when I need to study. If your kids are young you should probably do the cooking, but my youngest has been mixing and rolling these since she was six or seven.


Navajo Tacos

3 c small uncooked red beans
1 lb lean ground beef
1 – 8 oz can tomato sauce
1 pkg chili seasoning mix
Chopped lettuce
Chopped tomato
Chopped onion
Grated cheddar cheese
Salsa or taco sauce

Soak beans in cold water for at least two hours or overnight. Drain beans and place them in a large pot with 5 cups of water. Bring to a boil, cover and cook, boiling steadily for one hour. Reduce heat and cook, covered, for two more hours. Beans are done when the skin peels back when you blow on them.
While beans are cooking, brown beef and crumble, about 20 minutes. Drain grease. Add tomato sauce and chili seasoning and simmer for an additional 10 minutes to blend flavors.
While mixture is simmering, prepare a double batch of fry bread. 
To serve, spoon bean mixture onto hot fry bread and top with any combination of lettuce, tomato, onion, cheese, and salsa.
Indian Fry Bread

5 c flour
2 T baking powder
1 T melted butter
2 t salt
2 c milk
Oil for frying

          Mix dry ingredients. Stir in milk and butter a little at a time. Mix into soft dough but do not knead. Divide into golf ball sized portions and roll to 1/4-inch thickness. 
          Heat oil to medium heat. Oil will be up to temp when a small piece of bread dough sizzles when placed in oil. Fry til golden brown. Flip and fry on other side. Drain on paper towels. These can be kept hot in a 170 degree oven til ready to serve.


Tuesday, September 11, 2012

The Lightest, Crispiest Waffles Ever

My kids were astounded one day to see frozen waffles in the grocery store. We've always made them. Not from a mix, mind you, and not because I'm a waffle snob. I'm cheap.

After years of making waffles from scratch, I splurged and bought a mix. Know what I discovered? Scratch is better! And the bonus? They really don't take much more time than making them with a mix.

This recipe is the one we have used for years and have always had great results. The waffles are light and crisp. Top them with a little butter, yeah, the real stuff, and drizzle them with syrup and you're good to go.

This post is one of 30 in a series of Family Favorite Recipes. To see the rest, check here.

As a mom with a wild schedule, I have been known to cook up a bunch of these at once and freeze them in Ziplock baggies.

If you decide to try this, undercook slightly so you can pop them in the toaster later without burning them to a crisp. Let them cool on a wire rack before bagging or they stick together. To reheat, the toaster is the best option I have found to retain some crispness. If you're doing a bunch, put them on a cookie sheet and stick them under the broiler. Just keep an eye on them or they'll burn.The microwave will work in a pinch and are a great option for kids, just don't expect them to be crisp this way.

Waffles

1 ¾ c flour
1 T baking soda
½ t salt
2 eggs, separated
1 ¾ c milk
½ c oil

In a large mixing bowl, stir together flour, baking powder, and salt. Set aside. In a small mixing bowl, beat egg yolks with a fork. Beat in milk and oil. Add to flour mixture all at once. Stir til blended but still slightly lumpy.

In a small mixer bowl, beat egg whites ‘til stiff peaks form. Gently fold beaten egg whites into flour/milk mixture, leaving a few fluffs of egg white. Do not over mix. The egg white is what makes your waffles light and crispy. Cook on a lightly greased waffle iron as usual.

I have used up to ½ whole wheat flour with good results.


Monday, September 10, 2012

Recipe for Disaster

Not every day is perfect. Some need serious work. The newest recipe for the month of Family Favorite Recipes is not one that I'm fond of....sorry. If I could have skipped it, I would have. Really.

Recipe for Disaster

1 busy lady running full tilt
1 handful children
8 expected dinner guests
1 messy house
1 very solid and immovable couch
1 medical insurance policy that can't be used because the deductible is through the roof

Mix all together and watch the poor lady laugh and cry on the floor while she holds her foot. Groan in sympathy as she attempts to put her dislocated pinky toe back in place (it worked) as the kids look on in fascination. Serve with sympathy and dash of compassion as she hobbles around the house for the next week.

May you never find yourself serving this meal.

~ Erin  =]

Sunday, September 9, 2012

Tortilla Stew


If you like Taco Soup, you'll love this. It has a similar flavor but is thick and hearty and feels more substantial. My kids are not real soup fans. but they like this one. Maybe because it's not real soupy? For more kids friendly meals, check out 30 Family Favorite Recipes.

Savory chicken in a thick, slightly spicy stew, and garnished with tortillas, cheese, and cilantro, this dish is perfect for a cold winter night. 

The recipe is easy to double and freezes well. Portion out the soup to freeze before you add the tortillas. Package the tortillas separately in a Ziploc bag and add to the soup after reheating.

Tortilla Stew

2 qt chicken broth*
¼ c taco seasoning
1 c shredded chicken*
1 can corn
1 can black beans, drained and rinsed
1 can Piquinto beans (small pink beans in a mild sauce) or any other variety
1 pt salsa
1 c flour mixed with 1 ½ c water
1 can black olives. Sliced
3 tortillas, cut or torn into 1-inch squares (I prefer flour, but corn is good, too)
Grated cheddar cheese to garnish
Cilantro, chopped (optional – but really, really good)

Combine broth, taco seasoning, chicken, corn, beans, and salsa. Bring to a boil. Stir in flour mixture to thicken like a stew. Add olives and stir.
If serving everything, then add tortilla pieces and stir as well. If there will be leftovers, offer tortillas as a topping. This keeps them from becoming a soggy mess the next day. Garnish with cheddar cheese and cilantro if desired.

Saturday, September 8, 2012

Sloppy Joes

Sloppy Joes are awesome. They're messy and full of flavor and give you an excuse to lick your fingers at the dinner table. Those qualities alone should gain them a place on the 30 Family Favorites list.

My mother-in-law made this meal for her eight kids for years. I talked her out of the recipe. The rest is history.

These joes are the perfect balance of tangy with a touch of sweet, inexpensive to make, can be made ahead of time, can be frozen, and can hide healthy things. I've substituted cracked wheat cereal or 9-grain cereal for up to half of the meat without getting caught.

I did make some changes to her original recipe to fit my family's needs. I believe in the make it in a hurry method whenever possible. Life is busy. Kids have sports. Sometimes I forget to start dinner....sigh.

Sloppy Joes

2 lb hamburger
2 c catsup
1 T lemon juice
½ c chopped celery
¼ c chopped green pepper
1 onion, chopped
2 T vinegar
Salt and pepper to taste
¾ T Worcestershire sauce
2 T brown sugar
¼ c water
½ T dry mustard (or less)

Brown meat and drain. Add all ingredients and let cook on low heat for one hour or longer until sauce becomes thick.
My In a Hurry Method: Brown and drain the hamburger. While meat is cooking, sauté the celery, peppers, and onion in 1 T butter until tender, then add to the meat. Add all remaining ingredients, but omit the water. Simmer for 10 -15 minutes.
Healthy variation: I have also substituted up to 2 cups of cooked 9-grain or cracked wheat cereal for half of the hamburger. This was usually left-overs from breakfast. Kids never knew the difference.

Friday, September 7, 2012

Sweet and Sour Salad


Soooo...to be honest, my kids can live without this recipe. It has green stuff in it. With that said, tough luck. It's my pick. I win.

To see the other recipes in my 30 Family Favorite Recipe series, clicky here.

I love a good salad, and this one is one of my favorites. My cousin gave me this recipe years ago and I had the sense to hold onto it. You'll want to, too.

The lettuce is crispy and the dressing has a sweet/tangy flavor. What makes it fantastic, though, is the addition of buttery, toasted Ramen noodles and walnuts. Oh. My.

I'll post a picture when I can actually find my camera. =]

Sweet and Sour Salad

1 c vegetable oil
¾ c sugar
½ c red wine vinegar (or regular)
3 t soy sauce
1 c chopped walnuts
1 – 3oz pkg Ramen noodles, dry and broken into small pieces
4 T butter
1 head romaine lettuce – rinsed, dried, and chopped
1 head fresh broccoli, chopped
1 bunch green onions, chopped

Whisk together oil, sugar, vinegar, and soy sauce. Best to make a day ahead but it’s not the end of the world if you don’t. It’ll be delicious anyway.
Melt butter in a frying pan over medium heat. Add crushed ramen noodles and walnuts; toast til golden brown.
Combine the Romaine, broccoli, and green onions. Add the dressing and toss. Sprinkle with ramen mixture before serving.

Thursday, September 6, 2012

Ultimate Grilled Cheese

Keeping to the 30 Family Favorite Recipes theme...

I'm posting one of my favorite simple recipes today because I have a million things to get done. I'm working on getting my first ever passport today!

As some of you know, I am a nursing student. This semester, over winter break, actually, I have the chance to travel to Ecuador for nearly a month as part of a cultural nursing course. I am excited and a bit nervous, but mostly in a panic to get the paperwork in order.

Sooooo...with that said, Ultimate Grilled Cheese it is. Probably for dinner tonight, too.

We all pretty much know how to make grilled cheese, right? Butter the outside of the bread and slap a piece of cheese inside, then fry it up.

What makes it really good is....drumroll, please...shredded Parmesan cheese toasted up to golden, crispy deliciousness on the outside.

The Parmesan can make even standard American cheese slices taste amazing.

Think Sizzler's Cheese Toast made into a sandwich.

For the record, the stuff in the plastic container will work in a pinch, but it tends to be saltier and isn't nearly as good.

Step it up and try Swiss cheese slices (yep, Kraft, in the wrapper).

Wanna get wild?

Use pepperjack cheese. On sourdough bread. With Parmesan on the outside.

Or slice a big, fat loaf of sweet French bread into a two-inch thick slice, from the bottom, cut a little pocket into the center of it (almost like you're trying to cut it into two slices but leaving the sides intact), stuff it with a slice of mozzarella cheese, and dip the outside in shredded Parmesan.

Notice how everything comes back to Parmesan?

Try it. You'll thank me. =]

Ultimate Grilled Cheese

2 slices bread of choice
1 slice cheese of choice to cover bread
Butter
Shredded Parmesan cheese

       Butter one side of each piece of bread. Sprinkle Parmesan cheese on a small plate. Press bread, buttered side down on the Parmesan. This makes the cheese stick a bit better than if you just sprinkled directly onto the bread. Place cheese between non buttered sides of bread.
       Grill in a non-stick pan at medium heat, flipping when the first side becomes golden brown. You know the routine. Don't wander away to be efficient and do something else, because it can burn fast. Especially if you think you have a minute to go check Facebook. I know.

Wednesday, September 5, 2012

Brown Sugar Sausage-Bacon Appetizers

I think I've told you that my mother-in-law is a fantastic cook. She has a recipe stash to envy. She makes everything, and lots of it. She revels in family parties, and food has always been a central part of those parties.

This is one of her recipes. The first time I saw these babies one Christmas morning, I thought yuck. Bacon and sugar?

But it was Christmas and I was a new addition to the family, so I was brave and tried them anyway. And then I tried another, and another. Little pieces of sausage, wrapped in bacon, coated with caramelized brown sugar, hot and sweet and salty...I about died.

This is one of those recipes that I recommend making infrequently. It does not go in the healthy section. It goes in the spoil me silly section and should be used accordingly. 

Christmas morning is a good time. Preferably when you have lots of company and have to share. 

I can't remember if this recipe was on my list of 30 Family Favorites to share with you guys. If it wasn't, it is now. There's no way I could pass on it. I'd feel like I was hoarding a family treasure, and I did promise to share.


I know my picture is dorky. Bear with me.

Brown Sugar Sausage-Bacon Appetizers

24 links uncooked sausage, cut in half
1 lb bacon, cut in half
1/2-1 lb lt brown sugar
toothpicks

Wrap each sausage piece with a piece of bacon. Secure with a toothpick. Arrange in a 9x13 pan. Sprinkle sausage with brown sugar. You can make these up the night before, cover and stick in the fridge at this point.

Bake at 350° for 1 to 1-1/2 hours to desired doneness.  Baste occasionally with drippings and break up any lumps in the sugar. Sugar will caramelize while cooking.

A Variation on Tacos

For the record, I made this for dinner tonight.

I burnt the hamburger while helping my daughter google primary sources of those who were aboard the Mayflower.

Then I dropped a glass bottle of jalepeno peppers while getting the cheese out of the fridge.

Then I got the whole blasted thing together and couldn't find the camera for your viewing pleasure.

Then I typed it all up and forgot to post it. So much for a post a day.

Move over Pioneer Woman. I am obviously stiff competition.

It still got devoured, by the way. I left to pick up daughter number two and came home to a pan that had been scraped clean. Just sayin', burnt and all.

My mom gave me this recipe several years ago. It's one of the few recipes that ALL of my kids eat without complaint, which puts it right up there in the solid gold department as far as I am concerned.

This is another recipe in the 30 Days of Family Friendly Recipes series. To see the rest, click here.

This one is pretty simple, can be made up ahead of time and baked just before dinner, and can easily be augmented to feed extra bodies that happen to stop by.

It's called Chili Stack - maybe because taco seasoning is made with chili powder? I contemplated changing the name to Taco Stack, but really, I couldn't do that to my kids. Chili Stack is family.

Chili Stack

2 lb hamburger
1/2 c onion, chopped fine (or 4 T dehydrated onion - I usually cheat and use dehydrated)
2/3 c taco seasoning (about 3 pkgs)
4 c water
8-16 oz shredded cheese 
8-10 flour tortillas

Brown hamburger and onion and drain grease. Add water and taco seasoning and simmer 10 minutes. Layer meat, cheese, tortilla, six times in a deep casserole dish. Top with meat and cheese. Pour any leftover sauce over the top. The sauce is juicy and soaks into the tortillas.

If you double the recipe, you can use a 9x13 pan. I often use extra tortillas and spread the meat and cheese a little thinner.

Cover and bake at 375 for 25 minutes. Let set for 5 minutes for juice to soak in. Cut in squares to serve.


Monday, September 3, 2012

Swedish Pancakes - American Style

This is part of my 30 Days of Family Favorite Recipes challenge. To see the rest, clicky here.

This is probably THE most requested breakfast meal in our home. If it's a birthday, this is what they want on their day. If we have company, this is what they want to make to show off.

The kids love these and tend to eat several, so I taught them how to make them. Makes them appreciate the work that goes into them, you know? These are fast for a small family, so don't let me scare you.

Swedish pancakes are basically a crepe, and we fill them, usually, with butter and powdered sugar that melt into deliciousness. Sometimes we'll use syrup instead, but powdered sugar is the regular go-to topping. Fresh strawberries are good if they're in season and we didn't eat them all the day before, or fresh peaches as pictured above. Not likely, but it COULD happen.

The trick to these is in the wrist and a good, non-stick pan.

Eventually I'll add pictures to this, but for now, use your imagination.

Swedish Pancakes

Ingredients:
4 eggs
2 c milk
2 c flour
1/8 c sugar
butter
powdered sugar

Beat together eggs, milk, flour, and sugar until batter is smooth. It will be thin. If you have a blender, it'll do a great job. You want it as smooth as possible because all your little lumps will show up when you pour the batter out.

Heat a large, non-stick frying pan over medium heat. Add a small amount of butter to the pan to coat. Pour a 3-4 inch circle of batter in the center of the pan, remove from heat, and tilt the pan in a circular motion to make the batter spread out to cover the bottom of the pan. Batter should be 1/8 -1/16 of an inch thick.

When edges appear lightly brown, flip and cook on the other side. These babies cook pretty fast, which is a good thing because kids eat them prety fast.

Remove from pan and top with a sliver of butter, then roll up or fold in half. At this point, I usually have a cookie sheet in the warm oven and I stockpile pancakes so everyone can eat at once. Just as easy to feed each person in rounds, serving up another hot one as it is done.

Now this is the important part. Open these guys up and sprinkle the powdered sugar inside. Not outside. It looks pretty outside, but the deliciousness is the butter/sugar melty center. Eat with a fork, or if you're like us, pick it up burrito style and have at it.

30 Days of Family Favorite Recipes

I missed day one and two. I'm going to cheat from the start and post those later today.

For now though, the goal is to post a one of my family's favorite recipes each day for the month of September.

This is a challenge for me as

1) It's hard for everyone to agree 100% on a favorite ~ I have a child that doesn't like melted cheese and another that doesn't like chocolate. Excuse me? They won't have a say here. Six against one. Majority rules.

2) I don't think I've ever done anything for 31 days straight. Not even make my bed. Maybe I should add bed making to my goals instead.

Just as a heads up, we're pretty basic around here. You won't find the fancy stuff that takes hours to make and minutes to devour. If I want to impress someone, that's another story, but we're talking efficiency now, and as a single mom with a busy schedule, efficiency rules the day and the dinner table.

All of the recipes in this series are ones that we have made many, many times. They are tried and true. The kids have given them the thumbs up review.

We gravitate towards foods that are fast, easy, use everyday ingredients that I have on hand, and use minimal prepackaged mixes. I like to cook from scratch because I know what's in my food that way and yeah, it's cheaper.

This morning I posted a recipe for homemade ice cream. I can't think of a better way to start.

I'll be adding to this list as I go along, but to give you an idea of what we consider favorites:

Jeanette's Basic Ice Cream
Swedish Pancakes
Ultimate Grilled Cheese - Basic with a twist that makes it great
Idaho Baked Potato Soup - From one of my Idaho sisters-in-law
Brown Sugar Sausage-Bacon Appetizers - Oh. My. Gosh.
Party Punch
Tortilla Stew
Sloppy Joes
Sweet and Sour Salad - I don't care what the kids say. This is fantastic!
Stafford Breakfast
Chili Stack
Pizza
Chicken Dressing Casserole
Chicken Poppy Casserole
Hot Chicken Salad - another mother-in-law recipe - yumm
Navajo Tacos and Fry Bread - Courtesy of my sister-in-law - my kids love it!
Chicken Roll Ups - A mother-in-law recipe, which means it's delicious
Sweet and Sour Chicken - Reminds me of Panda's orange chicken
Chili - Make a bunch and freeze it for later
Biscuits Supreme - A definite must have recipe
Basic Muffins and Favorite Variations - A breakfast favorite
Flour Tortillas - All the kids help make these - simple and great
Pumpkin Streusel Bread - A favorite for fall
Braden's Famous Focaccia - My son has been making this since he was eight and it's great
One Hour Cinnamon Rolls - Yep, start to finish in an hour
Puffy French Toast - You know those crispy, puffy french toast sticks you can get at restaurants?
Waffles - light and crisp and perfect
Super Simple Smoothies
Oatmeal Cake
A Recipe for Disaster

...and a little space for last minute picks...

If you have a family favorite, feel free to share! ~ Erin


The Best Ever Homemade Ice Cream

In honor of Labor Day and many, many family parties with  homemade ice cream...the day just wouldn't be the same without it.

This is the first in my attempt to post a recipe a day of our family's favorite recipes. To see the rest, clicky here. For the record, this is a work in progress until the end of the month. =]

My husband was one of eight kids, seven of whom were boys. When we all lived close together, family get-togethers were a blast. OK, yes, I muttered at the time, but our kids loved hanging out with their cousins, and of course, there was the food...  

When it came to family parties, we were all assigned to bring something. Most of us daughters-in-law got assigned homemade ice cream to go along with whatever else we brought, but no one could compete with my mother-in-law when it came to the ice cream. 

Believe me. I tried. 

One time, in desperation, I bought a couple cartons of Breyer's Mint Chocolate Chip (my favorite brand because it tastes homemade), plopped it in a bowl, used the mixer to soften it up, then stuck it in the ice cream maker and called it mine. 

I did get rave reviews at that family party, but couldn't keep a straight face when asked for the recipe. I confessed and got a couple of high-fives from my sisters-in-law. My kids still tease me about it.

This is my mother-in-law's recipe and she is famous for it. It's pretty much a given for Labor Day, Memorial Day, family birthdays, etc.

She has a basic base and then adds what she wants to it. A few of the favorite alterations are below. 

Jeanette's Basic Ice Cream
4 eggs
4-1/2 t vanilla
1/2 t salt
2-1/4 c sugar
4 c whipping cream
4 c half and half
1 c milk
Beat eggs ‘til slightly thickened. Add vanilla and salt. Slowly add sugar and beat til mixed. Mix in whipping cream and 2 c half and half. Pour into one gallon ice cream container and add remaining half and half. Add milk to fill line. 
Freeze according to ice cream maker instructions.
For our favorite variations, add the following to the base as directed:

Cookies and Cream:
1 sm pkg Oreo cookies - 2/3 broken and 1/3 finely smashed/crushed. 
To be fair, my mother-in-law scrapes the filling off the this last third before crushing, but I can never bring myself to do that.
When mostly frozen, after about 10-15 minutes, add cookies. Letting it set up a bit keeps everything from settling on the bottom.

Toasted Almond
1/2 c Nestle Quik
1/4-1/2 t almond extract
1-1/4 c toasted almonds 
For toasted almonds, heat oven to 350. Place almonds on a cookie sheet. Stir after 10 minutes. Cook for 3-5 minutes longer. Watch carefully as once they start to brown, they go from toasty to burnt quickly. Cool before adding to ice cream. These are soft when warm, but as they cool, they get crunchy.

Chocolate Chip:
1/2 c grated dark chocolate
1/2 c grated milk chocolate
I like to add peppermint extract, but I couldn't tell you how much. Maybe I'll experiment today. =]
For Chocolate/Chocolate Chip, add 1/2 c Nestle Quik as well.

Saturday, August 4, 2012

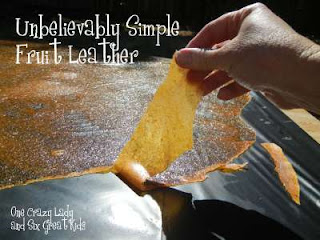
Bring on the Heat! Making Fruit Roll Outdoors

I am not a hot weather girl. I'm a wimp. I'm also a bit frugal, which translates to a woman who hates to turn on the air conditioner because I can literally hear the the bill add up. So why have I suddenly had a change of heart? What's with the hot weather hoorah? Why do I smile when thermometer hits 100 degrees?

Fruit roll....AKA fruit leather, but I grew up calling it fruit roll, so there you go.


I love the stuff...and we make it by the table full. When I was a kid, my parents used to make it. My brother and sister and I could strip the table bare in a day. It's a wonder we ever had any to store.

My kids and I usually make it with fresh fruit - bruised and overripe works fine. You can get the "ugly" stuff pretty cheap at fruit stands and the farmer's market. I've bought 40 pounds of peaches for $4 before. We'll pit it, heat it in a big pot with a bit of water to soften it up, then blend it to a puree. Don't bother to peel anything, even with the peaches. The skin adds a beautiful color, increased nutrition, and fiber. It also makes things much simpler, which is what it's all about when you've got a half dozen kids.For the record, peach, plum (delicious), apricot (favorite), nectarine, and pear all work well.

This time we had a bunch of canned fruit that had passed its prime. Awhile ago. The fruit was still good, but it gets unappealingly mushy after awhile. Enough said. We drained the cans, popped 'em in the blender, and we were good to go.


The kids set up the high tech special drying tables. By this I mean a scrap piece of plywood balanced on some 5 gallon buckets. The wood was covered with heavy black plastic garbage bags that had been cut open and clamped in place. You could probably use clothes pins to secure the plastic if your wood is thin enough. I use little spring wood clamps because I have a garage full of tools and my husband doesn't get upset anymore when I borrow them. There are advantages to being a widow at times. =]


The fruit puree was poured on top of the plastic and spread to about 1/8" thickness, then left in the sun to dry. Behold the finished product. We had to sample...it's part of the quality control process.

Before you ask, yes, the occasional bug does find its way onto the table. Be tough. Brush him off. Most stay away from it because the black plastic gets so darn hot in the sun. If your plastic touches the ground, you may have to deal with ants, though. Not fun. Keep that plastic pinned up.


When it was dry to the touch, I used a table knife to score the fruit leather and then peeled it up in sheets.


Then we placed it on saran wrap, rolled it up, and stored it in a ziplock baggie in the freezer.

One Crazy Lady's Fruit Roll

2 cans apricots
1 can peaches
1 can pears

Drain fruit and put it in the blender. Puree. Cover a flat surface with thick plastic. I prefer heavy duty contractor strength black garbage bags. Make sure the edges are secure or a breeze will blow them up and they'll stick to your fruit roll. Little spring wood clamps work great.

Pour out the fruit puree and spread about 1/8" thick. You can do this with your hand. Try to get it as even in thickness as possible, since the thin areas will dry faster. I tried making a leveling tool but my plywood wasn't quite flat. Hands it was.

Chase the kids away. They'll sneak into it. Peel up when dry and transfer to saran wrap, then roll and store in a ziplock baggie in the freezer. If you let it dry too long, it gets brittle when it cools.

Friday, November 18, 2011

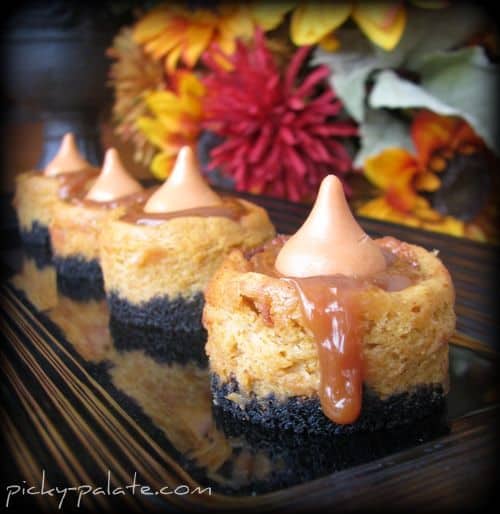
Pumpkin Cheesecake Bites Recipe

This is just a quickie because it looked so darn good.
 IMG_4037picnik.jpeg
Black Bottomed Mini Caramel Pumpkin Cheesecake Bites...and those Kisses on the top are called Pumpkin Spice. And is that a gorgeous picture or what? I can just see this for a Thanksgiving dessert! The recipe is at Picky Palate. Check it out! =]

Friday, October 28, 2011

Pumpkin Scones Recipe, Starbucks Style

I tried my very first Starbucks scone last weekend. It was delectable.
This morning, I checked my email and found a blog alert from RecipeGirl for her version. You can find the recipe here, at her blog.

***UPDATE 3/13*** - I tried this pumpkin scone recipe and I am in love. Seriously.
If they taste anything like the Starbucks version, as she says, then let me tell you, they are fantastic! She put solid layers of her plain and pumpkin spice glaze on each scone, rather than drizziling the spice one as Starbucks did.

 I like the look of the drizzly, but thinking all the extra flavor of more spice....mmmmm.....decisions!

This is a recipe I want to try. Now. Thanks, RecipeGirl!

Monday, October 10, 2011

Peter, Peter, Pumpkin Eater...Pumpkin Recipies for Fall

I love October. The air is cooler and the leaves are starting to change and fall. It makes me think of rain, hot cocoa, a good book, and a fire in the fireplace.

...And makes me hungry for pumpkin....


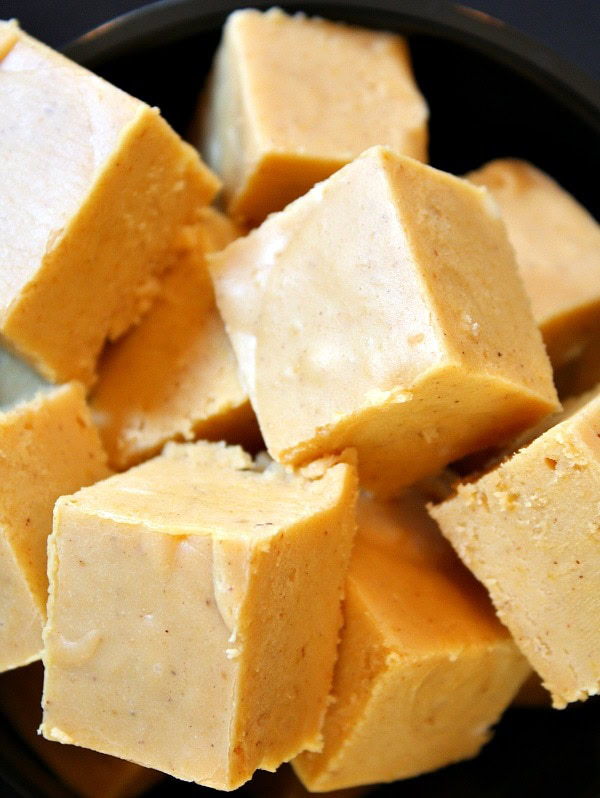
Came across this recipe for Pumpkin Fudge at Recipe Girl. Can't wait to try it out. Something about it just grabbed me. It was probably the word "fudge".


Then there's a recipe for Pumpkin Cream Cheese Truffles at Erins Food Files (not me...another Erin with great taste). OK...so they sound a little strange, but in a good way, right?  =]


...And Cream Cheese Rippled Pumpkin Bread from Lick the Bowl Good....Really, really want to try this one. We make a whole wheat pumpkin bread that is to die for. Yep. Whole wheat, and still great. If I have time to cook in the near future, I'll make it and post the recipe.


...And Pumpkin Pie Cupcakes over at Une-Deux Senses. These have a graham cracker base with vanilla cake and pumpkin pie frosting.

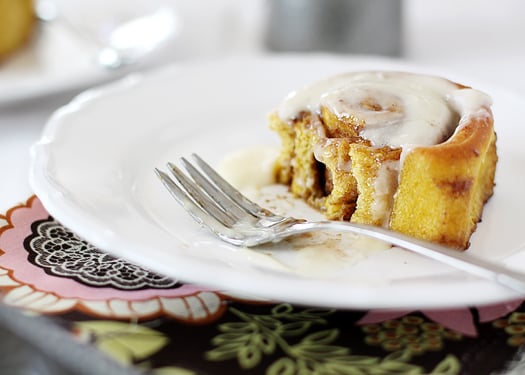
Pumpkin Cinnamon Rolls
...And Pumpkin Cinnamon Rolls from Goodlife Eats...


Which lead me to another of Goodlife's recipies, this one for Pumpkin Pie Oatmeal. Now, I am not an oatmeal fan, it's just a bit too slimy for me, but this looks more like dessert. Crunchy, sweet, and healthy enough that I can feed it to the kiddos in the morning and not feel guilty about it.

Who needs Halloween candy?

Friday, July 29, 2011

Cakalicious

My daughter had her 16th birthday yesterday.

Rather than say "Sweet 16 and never been kissed", we woke her up with a shower of Hershey's Kisses. Not a bad start, eh?

Her Swiss Swirl Ice Cream Cake was a group effort, and the recipe can be found here, at Taste of Home .

Daughter #3 was in charge of the Hoho cutting and did a fab job. We lined a glass bowl with saran wrap, then placed the sliced Hohos cut side down in the bowl, courtesy of Daughter #2, who fought for the privilege. We popped it in the freezer to firm up a bit.

Next we added the ice cream. One box Vanilla Chocolate Swirl. While I usually beat softened ice cream to make something like this, this time I cut it in slices (economy bargain box brand) and placed the slices in a complete layer using my hands. I'm not going to show a picture because it looks messy. Fun though. Just saying.

Freeze again and repeat with the second ice cream. We used plain old chocolate. Again we cut it in slices and pressed it into place. The advantage with cutting is that the consistency of the ice cream doesn't change with too much melting and refreezing. Also, it can be ready to eat faster. And yes, I was being lazy.

Cover with saran wrap and freeze.

When frozen and ready to go, peel off the saran wrap and invert it onto a plate.

We call this picture "The Unveiling".

Anxious for a slice....

 Not the prettiest shot. Found out that the ice cream was soft because the outside freezer had been unplugged all day. We had fired some beads that morning and only one plug fits at a time in that outlet. Probably a good thing we had this treat or who knows when we would have checked on the freezer again. Uggg.

Overall, it was a success. Only three plates? Someone must have put theirs in the dishwasher!

Pretty sweet with all the Hohos. I think I'd rather just go with straight ice cream, but it was definitely good and looked pretty nifty up close. If you give this a shot, I'd recommend placing the Hohos (actually, we used Little Debbie's Swiss Rolls) closer together than we did. Don't squish 'em, but no gap-age.

 This is what happens when you leave the camera on the table when you're done. =]

Thursday, July 28, 2011

Organize Your Favorite Finds on Pinterest


I fell in love with Pinterest. Head over heels. Completely. It's become an obsession. My house is a neglected mess, but I have soooo many new project ideas now that I pretend it's worth it.

Pinterest is basically an online bulletin board for your favorite internet pictures and the pictures you collect create links to the sites where they're found. You make up your own categories, for instance "Dessert Recipes", "Quilt Ideas", "DIY Projects", then when you come across something wonderful on a site, you click "pin it" and you catalog the picture you like for easy reference.

The fun part comes in when you "follow" other friends and super cool Pinterest people.You see what they've found, then copy what you want of their great finds to your boards. I'm smiling here because I LOVE the copy part. I never knew there were so many awesome things are out there, and I never would have stumbled across them without this site..

Some of my favorite finds so far...

A recipe for Nutella Truffles. You can find it here . So, my head keeps going to these with a hazlenut inside and dipped in melted chocolate with the hazlenuts sprinkled on top. Kind of a makeshift Ferrer Rocher.

These were just beautiful. Sigh. Key Lime Cupcakes with Blackberry Filling and Blackberry Frosting...


And sandwiches? The recipe for Mozzarella Grilled Cheese (with tomatoes and pesto) is here. I'm hungry. Can you tell?

This one makes me want to go garage sale shopping for a chair to paint. I'm doing this project just as soon as I find a cheapie chair. Sadly, the linky thing on Pinterest isn't working this time and I can't find the source of this picture. That happens sometimes. Darn it. 


Because I want others to share in my happy addiction, and because I want to see what cool things everyone else finds, go check out this site and sign up!. The link goes to one of my recipe pages. Yeah, I'm still hungry. Clicky here.You'll love it. =]

To find all my boards me on Pinterest, Clicky here!