Monday, November 11, 2013

The Shop at Pooh Corner

I met Francesca on Etsy, and she featured me on her blog a few months ago. Pretty nifty, eh?! It was my first feature ever, and I felt pretty special. 

Francesca's blog is a fun mix of insights on motherhood, give-aways, recipes, money saving tips, and more. It's named after a beautiful poem by William Ross Wallace, "The Hand That Rocks the Cradle is the Hand That Rules the World". I fell in love with that poem. I'd heard it before, but never read it in full.

I asked Francesca if she'd share a little about herself and her Etsy store, The Shop at Pooh Corner...and for those of you with kids, keep your eyes open for her puzzle, soon to be published in Hilights Magazine!

I decided to open a shop selling vintage items after hosting a giveaway on my blog for another children's vintage shop. I thought, "I can do that!" since I love thrift store shopping and I'm not very crafty.

I also wanted to sell paper crafts, since my mother-in-law got me a Cricut and I've always loved working with paper. So I make confetti and gift tags, too, which is more the focus of my shop since we no longer have two cars and I can't go vintage shopping as much.


The name of my shop is a play on the second Winnie-the-Pooh book by A. A. Milne: "The House at Pooh Corner." I chose it because Classic Pooh represents imagination  innocence  childhood, and a past era - all of which I hope you find in my shop.


Unfortunately I will be closing my shop after Valentine's Day to focus on my kids (I just had a baby!) and writing. Perhaps some day I will return to Etsy!


Thanks, 
Francesca


Friday, October 25, 2013

Apple Turnover Knit Sweater Design

I met Trudy on ETSY. She needed apple buttons for a children's sweater she was designing, and had ordered some of mine. I had no idea at the time that she was such an amazingly talented knitter. 

This is a sneak peek at Trudy's latest design, Apple Turnover. You can find her pattern here, at Raverlry. 

I think I'm in love. I need to learn how to knit, just so I can make this. Really.


See those buttons? Yep, I made them. Pretty exciting, huh?

I was so excited when she sent me the picture, I had to call all my kids in to look at it. 

I asked Trudy if she'd share some information about herself, how she got started in knitting and designing, and a few tips for those of us (ahem...yes, me) who might need a few words of encouragement before taking the plunge into knitting. She was sweet enough to say yes.

Without further ado...here's Trudy!  =]

I grew up in the Chicago suburbs, the artsy type who loved to draw and write stories, and wound up majoring in music.

During my freshman year of college, I saw a classmate knitting scarves. I thought it was bizarre yet fascinating. I had a lighter class load my junior year, and despite a lifelong lukewarm feeling towards crafts of any stripe, I inexplicably felt drawn to knitting.


I picked up a beginner's book and taught myself. I thought it would be a passing thing, but it stuck immediately! I made five scarves, followed by a pair of sweatpants, a coat, and a sweater, as I knit off an on over the next three years.


A cross-country move inspired me to start a knitting group in Albuquerque, and the wonderful friends I made there encouraged me to try new things. Kim, aka "The Sock Lady", taught me to knit socks, and I fell in love with sock knitting!


My fiance's job began taking us all over the Midwest, and I had to quit teaching music for a while. I began knitting like a woman obsessed! I also began designing, and released my first three designs on Ravelry at this time.


After becoming a mother in 2010, my children have been a source of constant inspiration for me. I began to get serious about designing in the past year, and have many designs in the works right now. What inspires my designs most are nature, the seasons, my children, and mythological figures. I have many future designs I'm planning based on gods and goddesses from Greek, Roman, and Celtic traditions.


This latest release, Apple Turnover, is the second in my Just Desserts series, a collection of whimsically dessert-themed garments for babies and children from 6 months to 6 years of age. Apple Turnover is a reversible, double knit coat with A-line shaping. The pattern comes with many tips and links to tutorials, as well as basic tips for making it a one-sided coat without double knitting, if you're not quite ready for that yet.


Being a self-employed private music teacher and a hopeful future home schooler, teaching and encouraging new knitter is something I love.

My best advice for those of you just beginning is to jump in with both feet and try the myriad of resources available to us in the Information Age. Be intimidated by nothing. No one is going to die if you mess up your knitting! I made plenty of mistakes when I first began. In fact, my very first practice swatch earned the name "Circular Rhombus".


The wonderful thing about knitting is that it's always one stitch at a time, and every single one gets easier.

Happy knitting!

- Trudy
.

Tuesday, March 5, 2013

When You Think Things are Bad, Focus on Blessings

I've been feeling sorry for myself lately. 

You know, when you get sick and feel awful, 
then suddenly everything gets to you....that kind of sorry.

I've been grouchy.

Cuss words grouchy.

It hasn't been a pretty sight.


I feel like I'm being pulled in a dozen different directions. 

I'm a full time nursing student, a single mom, the only driver in the household, and so, so tired...

I got through the days by thinking of all the people that had things worse than I did.

It probably wasn't the most positive way to deal, 
but it helped me to feel grateful for my circumstances, such as they were. 

It worked then.

I needed a dose of that today.

I got it tonight, in reverse.

My 15 year old daughter said her prayers with me.

It was a good, healthy reminder of what I have that's going right...and it put things in perspective.

I have so many blessings, and I have been focusing on the negative 
to the point that I have dismissed the positive.


It was a bit humbling to realize.

I cried.

In the grand scheme of things, our families are what are important.

The things we teach our children are important.

The time we spend with them is important.

And our attitudes are important...


Here's hoping that we all can see things just a little bit differently. 

With gratitude.

Friday, March 1, 2013

Starbucks Pumpkin Scones Recipe

I made these today and they were FANTASTIC. If you like Starbuck's Pumpkin Scones, you will love this recipe.
Truth be told, these are so easy, my kids make them without me.
Another truth. I ate three of them by myself.
They're dangerous.
You've been warned.
Starbucks Pumpkin Scones
Recipe adapted from Food.com
SCONES:
2 cups all-purpose flour
7 tablespoons sugar
1 tablespoon baking powder
1/2 teaspoon salt
1/2 teaspoon ground cinnamon
1/2 teaspoon ground nutmeg
1/4 teaspoon ground cloves
1/4 teaspoon ground ginger
6 tablespoons cold butter
1/2 cup canned pumpkin
3 tablespoons half-and-half (I used evaporated milk, because I had it, but non-fat milk works fine)
1 large egg

 POWDERED SUGAR GLAZE (painted on)
1 cup powdered sugar
1 tablespoon powdered sugar
2 tablespoons whole milk (I used evaporated milk)

 SPICED GLAZE (the drizzle)
1 cup powdered sugar
3 tablespoons powdered sugar
1/4 teaspoon ground cinnamon
1/8 teaspoon ground nutmeg
1 pinch ginger
1 pinch ground cloves 
Orange food coloring if you want the darker, pumpkin-y color 

Directions:

Preheat oven to 425 degrees F. Line cookie sheet with parchment paper.
Combine flour, sugar, baking powder, salt, and spices in a large bowl. Cut butter into the dry ingredients until mixture is crumbly. Set aside.

In a separate bowl, whisk together pumpkin, half and half or canned milk, and egg. Fold wet ingredients into dry ingredients. Form the dough into a ball.

Pat out dough onto a lightly floured surface and form it into a 1-inch thick rectangle (about 9 inches long and 3 inches wide). Use a large knife or a pizza cutter to slice the dough twice through the width, making three equal portions. Cut those three slices diagonally so that you have 6 triangular slices of dough.

Place on prepared baking sheet. Bake at 425 for 14-16 minutes. Scones should be a light brown. Cool on wire rack.

PLAIN GLAZE:
Mix powdered sugar and 2 T canned milk til smooth. When scones cool, brush on glaze to cover tops and sides.

SPICED ICING:
This gives your scones a little extra kick, and looks neat, so don't leave it out.
Combine all ingredients for spiced glaze. Add orange food coloring, a tiny bit at a time, til you get your desired color.

Drizzle icing over scone. You can do this off the end of a spoon, or make your own decorator bag by placing the glaze in a small baggie and snipping the corner off the bag.

Sunday, February 24, 2013

Top 10 Easter Egg Tutorials This Spring

There are so many amazingly talented people out there. 
After hours of gleaning Pinterest, blogs, and google, 
I compiled ten of my favorite Easter egg tutorials.

Yes, I know they're not all new this year. Some are just too cute to archive yet.
These are not in order of amazingness, by the way.
They are ALL knock your socks off fantastic in their own ways.

The goal with this post was to find tutorials that were not so far beyond the abilities 
of mere mortals I would never be able to reproduce 'em.

For the most part, I felt like I succeeded, 
but some of these were just so darn neat that I couldn't help 
but throw them into the mix for the daring.


Just to start you off right....baked eggs??? 
I've never tried this, but it looks like a great idea.

Wild Ink says that the eggs never crack (hate it when that happens!) 
and the yolks stay centered when they're done this way. 
Umm...smart. I'm definitely going to try this. 


These are amazing. The eggs are hollowed out, then painted with watercolors and watercolor pencils. They remind me of beautiful, fabric wrapped treasures. 

The neat part is that you don't have to be exact with the painting - the detail is all in the pencil. Check out Alisa Burke's page for details (and just keep looking!!!).


I have to brag on one more by Alisa Burke because they are so unique 
and I can't get them out of my head. 
Check out these eggs that are decorated with a Sharpie.


As a side note, I went to make breakfast and found the ones in the picture below in my fridge, courtesy of my teenage son. Teen boys should not be allowed on Pinterest. It gives 'em ideas.


I love these...I can just picture my kids erasing and drawing again and again. 
Paint eggs with calkboard paint and draw away. 
HomeMadeSimple has the tutorial on view 9 of 18.


Lil' Luna is always coming up with cute ideas. 
How about these subway art eggs made with vinyl stickers and acrylic paint? 
She used hard boiled eggs, but these turned out so nicely that 
I'd be tempted to use hollowed eggs and keep them around for a few years!


I love these beauties below from Brown Paper Packages
Each egg has been hollowed out and colorful napkins
were Mod Podged to the shell. 
The colors just say spring!


I love the colors you can get with natural dies. 
These have been colored with cabbage, onion skins, turmeric  beets, and other natural goodies. 
The Kitchn has the tutorial if you want to try a la natural.


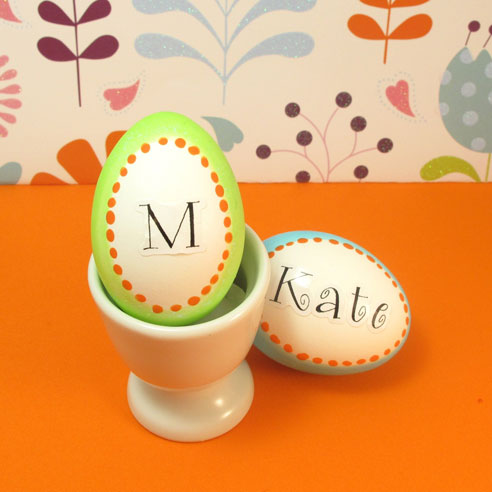
I thought these looked simple enough for the kidlets to make. 
BrightBoldAndBeautiful posted the original link to instructions. 
Since it's no longer accessible, here's my best guess.

Submerge your egg with one side up and exposed to create the white window. 
Frame it with some simple dots of acrylic paint or sharpie marker. 
Print out a name or Eastery word, trim close to the edge of the ink, and Mod Podge it in place.


Kind of a gold leaf look. I like the effect. 
Rich, elegant, simplistic. 
Amazing what you can do with a little masking tape and gold paint! 
Check out the tutorial at So Crafty.


This woman is genius! 
She used a paper punch on contact paper! 
You could do this with whatever punch shapes you have. 
I like this one a bunch....simple. 
Now to sepatate the backs off of those little circles....

Abbie Living has the tutorial here.


Crafts by Amanda has tutorials on 7 Cool Ways to Dye Easter Eggs
These are called Chinese tea eggs, though I've seen them called dinosaur eggs on other pages. 
I STILL remember the deviled egg sandwiches my mom made 
with the shattered eggs when I was a kid.


If you're feeling really ambitious......check out the tutorial for these beauties. 
A hollowed egg gets a design made with 3-D paint, then a coat of acrylic. 
The rose is a piece of a napkin and a little Mod Podge.

The page is in Polish, but google translate works wonders, and the pictures show 
everything you need to know. Beautiful work by  Sylvia Serwin.
And while you're there, check out her cut ostrich eggs. Wow.


A tisket a tasket, I need to make this basket. 
Moda Bake Shop has the tutorial here
You know you need it for all the beautiful eggs you are going to make....


Happy Easter!!!