Tuesday, February 11, 2014

Dresser Makeover


I've had a dresser sitting on my back porch for the last few months. I was itching to paint it, but wasn't quite sure what I wanted to do, and to be honest, I'm not very experienced with furniture refinishing. (You can see my last experiment here.)

And I didn't have a lot of money to spend on it.

And the person who gave it to me dropped it out of the back of his truck when he drove it over, and broke a few of the drawers. Seriously. What is it with men who don't think they need to tie things down?

My late husband lost an antique piano out of the back of his truck once. He looked in the rear view mirror and saw it sliding, upside down, behind him on the freeway. This was 23 years ago. Some things just don't get forgotten.

With that said, I think it turned out well, and it was EASY.

SUPPLIES:
2 cans Rust-oleum Ultra Cover Flat Black Primer spray paint
2 cans Rust-oleum Satin Black spray paint
220 grit sandpaper
Sanding sponge
Howard - Citrus Shield Premium Paste Wax (Walnut)
2 junk rags (one for application and one to remove)
Jute cording from Hobby Lobby
Newspapers or drop cloth to protect the ground


Here's the mess of a dresser. I started taking out drawers before I remembered to grab the camera, and I was too lazy to put them back in for a picture. When I get started on a project, I really dislike having to back up and undo what I've done. I'm always a little afraid I'll put it all off and decide to start again another day.

Lots of broken drawer pulls on this beast, and after pricing hardware, I decided I needed to come up with a different option.

 I gave the whole thing a light sanding with a directional sander and a little foam sanding block, then hit it with black primer spray paint.
Once it was well covered, I painted again with two coats of Rust-Oleum black satin spray paint. Then I roughed up the edges with a small piece of sand paper. I also lightly sanded the front of the dresser. This step made me nervous, because it left little scratch marks in the finish. It worked out, though, by the time I was done.

This is where it got fun. I found a font I liked, and blew up the numbers to the size I wanted, and printed it on some old scratch paper. Then I used the side of a piece of chalk to cover the back side of the image I wanted to transfer.


Then I positioned the image where I wanted it, and traced it with a pencil.

Wa-lah!
Then I painted in the number with a white acrylic paint from the craft store. It took two coats and looked pretty splotchy, but I didn't worry about it since I was going to sand it anyway.


Once it was dry, I sanded lightly, again going with the grain of wood. I wiped off the chalk and paint dust with a damp rag.


Once everything was painted, I waxed it with Howard Citrus Shield Premium Paste Wax. This was important, as it reduced the milky looking sanding marks all over the piece, lightly stained the exposed wood to a rich brown, and gave the whole piece a glowing, rich look.


I had plans for a heavier rope drawer pull, but couldn't find what I wanted. I ended up using this twine instead, and like it. Tied a knot, threaded it through the holes, and tied the other end. Cheap. Done. Kind of old fashioned.

A couple of months ago, I visited Quiltique in Las Vegas, and fell in love with a gorgeous quilt on the wall. It was beautifully done, and I spent forever trying to find fabrics that somewhat matched the ones used. One of the fabrics had a solid background with a white alphabet on it. It was a little old fashioned looking, and it pretty much was the inspiration for this dresser.

On a side note, after I finished the dresser and posted pictures on Facebook (and confessed to the quilt envy inspiration), I found out that a friend of mine MADE that display quilt. I had to laugh. I drove 500 miles, visited several quilt shops that I've never been to before, saw dozens of gorgeous quilts on display, and hers was the one that caught my eye.

Tami's quilt...
Tami's quilt...

Monday, November 11, 2013

The Shop at Pooh Corner

I met Francesca on Etsy, and she featured me on her blog a few months ago. Pretty nifty, eh?! It was my first feature ever, and I felt pretty special. 

Francesca's blog is a fun mix of insights on motherhood, give-aways, recipes, money saving tips, and more. It's named after a beautiful poem by William Ross Wallace, "The Hand That Rocks the Cradle is the Hand That Rules the World". I fell in love with that poem. I'd heard it before, but never read it in full.

I asked Francesca if she'd share a little about herself and her Etsy store, The Shop at Pooh Corner...and for those of you with kids, keep your eyes open for her puzzle, soon to be published in Hilights Magazine!

I decided to open a shop selling vintage items after hosting a giveaway on my blog for another children's vintage shop. I thought, "I can do that!" since I love thrift store shopping and I'm not very crafty.

I also wanted to sell paper crafts, since my mother-in-law got me a Cricut and I've always loved working with paper. So I make confetti and gift tags, too, which is more the focus of my shop since we no longer have two cars and I can't go vintage shopping as much.


The name of my shop is a play on the second Winnie-the-Pooh book by A. A. Milne: "The House at Pooh Corner." I chose it because Classic Pooh represents imagination  innocence  childhood, and a past era - all of which I hope you find in my shop.


Unfortunately I will be closing my shop after Valentine's Day to focus on my kids (I just had a baby!) and writing. Perhaps some day I will return to Etsy!


Thanks, 
Francesca


Friday, October 25, 2013

Apple Turnover Knit Sweater Design

I met Trudy on ETSY. She needed apple buttons for a children's sweater she was designing, and had ordered some of mine. I had no idea at the time that she was such an amazingly talented knitter. 

This is a sneak peek at Trudy's latest design, Apple Turnover. You can find her pattern here, at Raverlry. 

I think I'm in love. I need to learn how to knit, just so I can make this. Really.


See those buttons? Yep, I made them. Pretty exciting, huh?

I was so excited when she sent me the picture, I had to call all my kids in to look at it. 

I asked Trudy if she'd share some information about herself, how she got started in knitting and designing, and a few tips for those of us (ahem...yes, me) who might need a few words of encouragement before taking the plunge into knitting. She was sweet enough to say yes.

Without further ado...here's Trudy!  =]

I grew up in the Chicago suburbs, the artsy type who loved to draw and write stories, and wound up majoring in music.

During my freshman year of college, I saw a classmate knitting scarves. I thought it was bizarre yet fascinating. I had a lighter class load my junior year, and despite a lifelong lukewarm feeling towards crafts of any stripe, I inexplicably felt drawn to knitting.


I picked up a beginner's book and taught myself. I thought it would be a passing thing, but it stuck immediately! I made five scarves, followed by a pair of sweatpants, a coat, and a sweater, as I knit off an on over the next three years.


A cross-country move inspired me to start a knitting group in Albuquerque, and the wonderful friends I made there encouraged me to try new things. Kim, aka "The Sock Lady", taught me to knit socks, and I fell in love with sock knitting!


My fiance's job began taking us all over the Midwest, and I had to quit teaching music for a while. I began knitting like a woman obsessed! I also began designing, and released my first three designs on Ravelry at this time.


After becoming a mother in 2010, my children have been a source of constant inspiration for me. I began to get serious about designing in the past year, and have many designs in the works right now. What inspires my designs most are nature, the seasons, my children, and mythological figures. I have many future designs I'm planning based on gods and goddesses from Greek, Roman, and Celtic traditions.


This latest release, Apple Turnover, is the second in my Just Desserts series, a collection of whimsically dessert-themed garments for babies and children from 6 months to 6 years of age. Apple Turnover is a reversible, double knit coat with A-line shaping. The pattern comes with many tips and links to tutorials, as well as basic tips for making it a one-sided coat without double knitting, if you're not quite ready for that yet.


Being a self-employed private music teacher and a hopeful future home schooler, teaching and encouraging new knitter is something I love.

My best advice for those of you just beginning is to jump in with both feet and try the myriad of resources available to us in the Information Age. Be intimidated by nothing. No one is going to die if you mess up your knitting! I made plenty of mistakes when I first began. In fact, my very first practice swatch earned the name "Circular Rhombus".


The wonderful thing about knitting is that it's always one stitch at a time, and every single one gets easier.

Happy knitting!

- Trudy
.

Tuesday, March 5, 2013

When You Think Things are Bad, Focus on Blessings

I've been feeling sorry for myself lately. 

You know, when you get sick and feel awful, 
then suddenly everything gets to you....that kind of sorry.

I've been grouchy.

Cuss words grouchy.

It hasn't been a pretty sight.


I feel like I'm being pulled in a dozen different directions. 

I'm a full time nursing student, a single mom, the only driver in the household, and so, so tired...

I got through the days by thinking of all the people that had things worse than I did.

It probably wasn't the most positive way to deal, 
but it helped me to feel grateful for my circumstances, such as they were. 

It worked then.

I needed a dose of that today.

I got it tonight, in reverse.

My 15 year old daughter said her prayers with me.

It was a good, healthy reminder of what I have that's going right...and it put things in perspective.

I have so many blessings, and I have been focusing on the negative 
to the point that I have dismissed the positive.


It was a bit humbling to realize.

I cried.

In the grand scheme of things, our families are what are important.

The things we teach our children are important.

The time we spend with them is important.

And our attitudes are important...


Here's hoping that we all can see things just a little bit differently. 

With gratitude.

Friday, March 1, 2013

Starbucks Pumpkin Scones Recipe

I made these today and they were FANTASTIC. If you like Starbuck's Pumpkin Scones, you will love this recipe.
Truth be told, these are so easy, my kids make them without me.
Another truth. I ate three of them by myself.
They're dangerous.
You've been warned.
Starbucks Pumpkin Scones
Recipe adapted from Food.com
SCONES:
2 cups all-purpose flour
7 tablespoons sugar
1 tablespoon baking powder
1/2 teaspoon salt
1/2 teaspoon ground cinnamon
1/2 teaspoon ground nutmeg
1/4 teaspoon ground cloves
1/4 teaspoon ground ginger
6 tablespoons cold butter
1/2 cup canned pumpkin
3 tablespoons half-and-half (I used evaporated milk, because I had it, but non-fat milk works fine)
1 large egg

 POWDERED SUGAR GLAZE (painted on)
1 cup powdered sugar
1 tablespoon powdered sugar
2 tablespoons whole milk (I used evaporated milk)

 SPICED GLAZE (the drizzle)
1 cup powdered sugar
3 tablespoons powdered sugar
1/4 teaspoon ground cinnamon
1/8 teaspoon ground nutmeg
1 pinch ginger
1 pinch ground cloves 
Orange food coloring if you want the darker, pumpkin-y color 

Directions:

Preheat oven to 425 degrees F. Line cookie sheet with parchment paper.
Combine flour, sugar, baking powder, salt, and spices in a large bowl. Cut butter into the dry ingredients until mixture is crumbly. Set aside.

In a separate bowl, whisk together pumpkin, half and half or canned milk, and egg. Fold wet ingredients into dry ingredients. Form the dough into a ball.

Pat out dough onto a lightly floured surface and form it into a 1-inch thick rectangle (about 9 inches long and 3 inches wide). Use a large knife or a pizza cutter to slice the dough twice through the width, making three equal portions. Cut those three slices diagonally so that you have 6 triangular slices of dough.

Place on prepared baking sheet. Bake at 425 for 14-16 minutes. Scones should be a light brown. Cool on wire rack.

PLAIN GLAZE:
Mix powdered sugar and 2 T canned milk til smooth. When scones cool, brush on glaze to cover tops and sides.

SPICED ICING:
This gives your scones a little extra kick, and looks neat, so don't leave it out.
Combine all ingredients for spiced glaze. Add orange food coloring, a tiny bit at a time, til you get your desired color.

Drizzle icing over scone. You can do this off the end of a spoon, or make your own decorator bag by placing the glaze in a small baggie and snipping the corner off the bag.

Sunday, February 24, 2013

Top 10 Easter Egg Tutorials This Spring

There are so many amazingly talented people out there. 
After hours of gleaning Pinterest, blogs, and google, 
I compiled ten of my favorite Easter egg tutorials.

Yes, I know they're not all new this year. Some are just too cute to archive yet.
These are not in order of amazingness, by the way.
They are ALL knock your socks off fantastic in their own ways.

The goal with this post was to find tutorials that were not so far beyond the abilities 
of mere mortals I would never be able to reproduce 'em.

For the most part, I felt like I succeeded, 
but some of these were just so darn neat that I couldn't help 
but throw them into the mix for the daring.


Just to start you off right....baked eggs??? 
I've never tried this, but it looks like a great idea.

Wild Ink says that the eggs never crack (hate it when that happens!) 
and the yolks stay centered when they're done this way. 
Umm...smart. I'm definitely going to try this. 


These are amazing. The eggs are hollowed out, then painted with watercolors and watercolor pencils. They remind me of beautiful, fabric wrapped treasures. 

The neat part is that you don't have to be exact with the painting - the detail is all in the pencil. Check out Alisa Burke's page for details (and just keep looking!!!).


I have to brag on one more by Alisa Burke because they are so unique 
and I can't get them out of my head. 
Check out these eggs that are decorated with a Sharpie.


As a side note, I went to make breakfast and found the ones in the picture below in my fridge, courtesy of my teenage son. Teen boys should not be allowed on Pinterest. It gives 'em ideas.


I love these...I can just picture my kids erasing and drawing again and again. 
Paint eggs with calkboard paint and draw away. 
HomeMadeSimple has the tutorial on view 9 of 18.


Lil' Luna is always coming up with cute ideas. 
How about these subway art eggs made with vinyl stickers and acrylic paint? 
She used hard boiled eggs, but these turned out so nicely that 
I'd be tempted to use hollowed eggs and keep them around for a few years!


I love these beauties below from Brown Paper Packages
Each egg has been hollowed out and colorful napkins
were Mod Podged to the shell. 
The colors just say spring!


I love the colors you can get with natural dies. 
These have been colored with cabbage, onion skins, turmeric  beets, and other natural goodies. 
The Kitchn has the tutorial if you want to try a la natural.


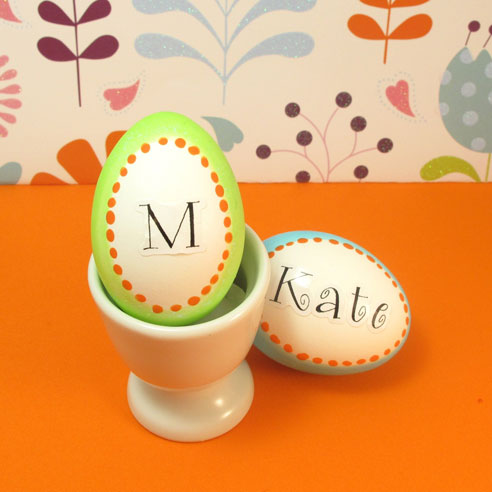
I thought these looked simple enough for the kidlets to make. 
BrightBoldAndBeautiful posted the original link to instructions. 
Since it's no longer accessible, here's my best guess.

Submerge your egg with one side up and exposed to create the white window. 
Frame it with some simple dots of acrylic paint or sharpie marker. 
Print out a name or Eastery word, trim close to the edge of the ink, and Mod Podge it in place.


Kind of a gold leaf look. I like the effect. 
Rich, elegant, simplistic. 
Amazing what you can do with a little masking tape and gold paint! 
Check out the tutorial at So Crafty.


This woman is genius! 
She used a paper punch on contact paper! 
You could do this with whatever punch shapes you have. 
I like this one a bunch....simple. 
Now to sepatate the backs off of those little circles....

Abbie Living has the tutorial here.


Crafts by Amanda has tutorials on 7 Cool Ways to Dye Easter Eggs
These are called Chinese tea eggs, though I've seen them called dinosaur eggs on other pages. 
I STILL remember the deviled egg sandwiches my mom made 
with the shattered eggs when I was a kid.


If you're feeling really ambitious......check out the tutorial for these beauties. 
A hollowed egg gets a design made with 3-D paint, then a coat of acrylic. 
The rose is a piece of a napkin and a little Mod Podge.

The page is in Polish, but google translate works wonders, and the pictures show 
everything you need to know. Beautiful work by  Sylvia Serwin.
And while you're there, check out her cut ostrich eggs. Wow.


A tisket a tasket, I need to make this basket. 
Moda Bake Shop has the tutorial here
You know you need it for all the beautiful eggs you are going to make....


Happy Easter!!!


Monday, October 8, 2012

And I Simply Decided to be Happy Again


I was just thinking today about my decision to be happy.


My husband had passed away and I was determined that I would be one of those widows who always wore black and had the air of dignified, brokenhearted sadness about her.

Really, I was never going to smile again. Then the Big Guy would know just how much I loved him and missed him. So would the world.

Ahhh… how noble it would be to go through life and never again experience joy because of my loss.

A plastic grocery bag blew across the street in front of me and I started crying. It was pretty pathetic.

Then one day, I caught myself smiling and laughing at something.

I cried all over again, because really, was I supposed to be happy?

I decided then that this sad life was not the life I wanted. I didn't want to be a martyr. I wanted joy again. I wanted my kids to see me laughing. I wanted them to be happy.

And so I decided to be happy.

It wasn't an automatic switch.

It still took time.

I still cried when I answered the phone and someone asked for my husband.

I still cried at night when I said my prayers.

But the decision was there and happiness followed.

I am so glad that I made that decision. My big guy would have wanted me happy. 

Wednesday, September 26, 2012

Idaho Baked Potato Soup


Idaho Baked Potato Soup is one of my all time favorite soups for fall. Imagine a big baked potato smothered in butter, bacon, cheese, and sour cream. Now imagine it hot and ready on your stove all day long!
 
This soup smells wonderful and is so filling. It lasts pretty well in the fridge and heats up nicely for lunch. It's probably not a good cantidate for freezing, but we never got that far. For more family favorites, clicky here.
 
This recipe is from my sister-in-law. She's an Idaho girl. =]
 
Idaho Baked Potato Soup

½ c butter
½ c flour
7 c milk
4 lg potatoes, baked, cubed, and peeled
4 green onions, sliced
1 lb bacon, cooked and crumbled
2 c shredded cheddar cheese
1 c sour cream
1 t salt
½ t pepper

Melt butter in a large soup pot. Stir in flour. Heat and stir until smooth. Gradually add milk, stirring until thickened. If you pour it all in at once, it takes forever to heat and doesn’t seem to thicken. The dump it all together method does not save time on this one.

Add potatoes and onion. Bring to a boil, stirring constantly. Reduce heat. Simmer 10 minutes. Add remaining ingredients. Stir until cheese is melted. Makes 2 ½ quarts.

Navajo Tacos / AKA Almost Copycat Taco Bell Chalupas

Have you ever tried Taco Bell's chalupas? I know it's probably uncool, but I have to confess that I love 'em. That's why they're here in the 30 Days of Family Favorite Recipes.

These babies, Navajo Tacos, remind me of them. They're a special treat and we don't have them often, but when we do....ahhhh....bliss!

They're pretty simple to make - so simple in fact, that my kids can make them, and often do when I need to study. If your kids are young you should probably do the cooking, but my youngest has been mixing and rolling these since she was six or seven.


Navajo Tacos

3 c small uncooked red beans
1 lb lean ground beef
1 – 8 oz can tomato sauce
1 pkg chili seasoning mix
Chopped lettuce
Chopped tomato
Chopped onion
Grated cheddar cheese
Salsa or taco sauce

Soak beans in cold water for at least two hours or overnight. Drain beans and place them in a large pot with 5 cups of water. Bring to a boil, cover and cook, boiling steadily for one hour. Reduce heat and cook, covered, for two more hours. Beans are done when the skin peels back when you blow on them.
While beans are cooking, brown beef and crumble, about 20 minutes. Drain grease. Add tomato sauce and chili seasoning and simmer for an additional 10 minutes to blend flavors.
While mixture is simmering, prepare a double batch of fry bread. 
To serve, spoon bean mixture onto hot fry bread and top with any combination of lettuce, tomato, onion, cheese, and salsa.
Indian Fry Bread

5 c flour
2 T baking powder
1 T melted butter
2 t salt
2 c milk
Oil for frying

          Mix dry ingredients. Stir in milk and butter a little at a time. Mix into soft dough but do not knead. Divide into golf ball sized portions and roll to 1/4-inch thickness. 
          Heat oil to medium heat. Oil will be up to temp when a small piece of bread dough sizzles when placed in oil. Fry til golden brown. Flip and fry on other side. Drain on paper towels. These can be kept hot in a 170 degree oven til ready to serve.


Sunday, September 23, 2012

Show Your Kids How Much You Love Them

I fell off the wagon. I was going to post thirty recipes in thirty days, then life got busy and I stopped. Now it's been....awhile...and I'm almost embarrassed to come back. Aaarg.

So much for goals.

Here's a better one, at least for the moment, that I found on Amy Lynn Andrews' wonderful Facebook page.


I decided to put this one to the test.

I hugged my 13 year old daughter goodnight and didn't let go.

She hugged me back and didn't let go.

For a long time.

And then we both started giggling.

For a long time.

It made me wonder how many times I pull away first because important things need to get done - and how much my kids want to hold on just a little longer.

It's sometimes hard as a single mom, and a widow at that, to find the time to do everything (which is why my kitchen floor is still a mess, but that's another story). Yet when the day comes to an end, they are most important in my life....and they need to know it.

Try an experiment. Hug your kids tonight and wait for them to pull back first. See if they notice a difference. I think you'll be pleasantly surprised.  =]

Tuesday, September 11, 2012

The Lightest, Crispiest Waffles Ever

My kids were astounded one day to see frozen waffles in the grocery store. We've always made them. Not from a mix, mind you, and not because I'm a waffle snob. I'm cheap.

After years of making waffles from scratch, I splurged and bought a mix. Know what I discovered? Scratch is better! And the bonus? They really don't take much more time than making them with a mix.

This recipe is the one we have used for years and have always had great results. The waffles are light and crisp. Top them with a little butter, yeah, the real stuff, and drizzle them with syrup and you're good to go.

This post is one of 30 in a series of Family Favorite Recipes. To see the rest, check here.

As a mom with a wild schedule, I have been known to cook up a bunch of these at once and freeze them in Ziplock baggies.

If you decide to try this, undercook slightly so you can pop them in the toaster later without burning them to a crisp. Let them cool on a wire rack before bagging or they stick together. To reheat, the toaster is the best option I have found to retain some crispness. If you're doing a bunch, put them on a cookie sheet and stick them under the broiler. Just keep an eye on them or they'll burn.The microwave will work in a pinch and are a great option for kids, just don't expect them to be crisp this way.

Waffles

1 ¾ c flour
1 T baking soda
½ t salt
2 eggs, separated
1 ¾ c milk
½ c oil

In a large mixing bowl, stir together flour, baking powder, and salt. Set aside. In a small mixing bowl, beat egg yolks with a fork. Beat in milk and oil. Add to flour mixture all at once. Stir til blended but still slightly lumpy.

In a small mixer bowl, beat egg whites ‘til stiff peaks form. Gently fold beaten egg whites into flour/milk mixture, leaving a few fluffs of egg white. Do not over mix. The egg white is what makes your waffles light and crispy. Cook on a lightly greased waffle iron as usual.

I have used up to ½ whole wheat flour with good results.


Monday, September 10, 2012

Recipe for Disaster

Not every day is perfect. Some need serious work. The newest recipe for the month of Family Favorite Recipes is not one that I'm fond of....sorry. If I could have skipped it, I would have. Really.

Recipe for Disaster

1 busy lady running full tilt
1 handful children
8 expected dinner guests
1 messy house
1 very solid and immovable couch
1 medical insurance policy that can't be used because the deductible is through the roof

Mix all together and watch the poor lady laugh and cry on the floor while she holds her foot. Groan in sympathy as she attempts to put her dislocated pinky toe back in place (it worked) as the kids look on in fascination. Serve with sympathy and dash of compassion as she hobbles around the house for the next week.

May you never find yourself serving this meal.

~ Erin  =]

Sunday, September 9, 2012

Tortilla Stew


If you like Taco Soup, you'll love this. It has a similar flavor but is thick and hearty and feels more substantial. My kids are not real soup fans. but they like this one. Maybe because it's not real soupy? For more kids friendly meals, check out 30 Family Favorite Recipes.

Savory chicken in a thick, slightly spicy stew, and garnished with tortillas, cheese, and cilantro, this dish is perfect for a cold winter night. 

The recipe is easy to double and freezes well. Portion out the soup to freeze before you add the tortillas. Package the tortillas separately in a Ziploc bag and add to the soup after reheating.

Tortilla Stew

2 qt chicken broth*
¼ c taco seasoning
1 c shredded chicken*
1 can corn
1 can black beans, drained and rinsed
1 can Piquinto beans (small pink beans in a mild sauce) or any other variety
1 pt salsa
1 c flour mixed with 1 ½ c water
1 can black olives. Sliced
3 tortillas, cut or torn into 1-inch squares (I prefer flour, but corn is good, too)
Grated cheddar cheese to garnish
Cilantro, chopped (optional – but really, really good)

Combine broth, taco seasoning, chicken, corn, beans, and salsa. Bring to a boil. Stir in flour mixture to thicken like a stew. Add olives and stir.
If serving everything, then add tortilla pieces and stir as well. If there will be leftovers, offer tortillas as a topping. This keeps them from becoming a soggy mess the next day. Garnish with cheddar cheese and cilantro if desired.

Toilet Paper from Heaven

Sometimes blessings come from the most unlikely places.

I had an experience several years ago that will stay with me. It confirmed to me that our Heavenly Father hears us, He know our needs, and He will help us.

Once upon a time, I was sick as a dog. I couldn't do anything. It was bad. My husband had died the previous year and not one of my six kids was old enough to drive. And then the worst happened. We were on our last roll of toilet paper.

Source unknown
Low and behold, at about 11 PM that night, my boys got all excited and came running into my room. "Mom! Someone TP'd our house!" 

My reply? "Oh, thank you Heavenly Father for answering prayers! Boys, go roll it up. We're gonna make it. "

We have a big tree in our yard. Those kids didn't skimp, let me tell you. They used rolls and rolls and they must not have been pros because they left several of those rolls only half used. And it was the good stuff. I felt spoiled.

Lessons learned?
  • Heavenly Father answers prayers.
  • He has a sense of humor. Really.
  • Blessings can come from unlikely sources.
  • Sometime you have to look for those blessings in the gifts that are given.
  • What you do today may be the answer to somebody's prayer.
  • May we give of our best! =]

Saturday, September 8, 2012

Sloppy Joes

Sloppy Joes are awesome. They're messy and full of flavor and give you an excuse to lick your fingers at the dinner table. Those qualities alone should gain them a place on the 30 Family Favorites list.

My mother-in-law made this meal for her eight kids for years. I talked her out of the recipe. The rest is history.

These joes are the perfect balance of tangy with a touch of sweet, inexpensive to make, can be made ahead of time, can be frozen, and can hide healthy things. I've substituted cracked wheat cereal or 9-grain cereal for up to half of the meat without getting caught.

I did make some changes to her original recipe to fit my family's needs. I believe in the make it in a hurry method whenever possible. Life is busy. Kids have sports. Sometimes I forget to start dinner....sigh.

Sloppy Joes

2 lb hamburger
2 c catsup
1 T lemon juice
½ c chopped celery
¼ c chopped green pepper
1 onion, chopped
2 T vinegar
Salt and pepper to taste
¾ T Worcestershire sauce
2 T brown sugar
¼ c water
½ T dry mustard (or less)

Brown meat and drain. Add all ingredients and let cook on low heat for one hour or longer until sauce becomes thick.
My In a Hurry Method: Brown and drain the hamburger. While meat is cooking, sauté the celery, peppers, and onion in 1 T butter until tender, then add to the meat. Add all remaining ingredients, but omit the water. Simmer for 10 -15 minutes.
Healthy variation: I have also substituted up to 2 cups of cooked 9-grain or cracked wheat cereal for half of the hamburger. This was usually left-overs from breakfast. Kids never knew the difference.

Friday, September 7, 2012

Sweet and Sour Salad


Soooo...to be honest, my kids can live without this recipe. It has green stuff in it. With that said, tough luck. It's my pick. I win.

To see the other recipes in my 30 Family Favorite Recipe series, clicky here.

I love a good salad, and this one is one of my favorites. My cousin gave me this recipe years ago and I had the sense to hold onto it. You'll want to, too.

The lettuce is crispy and the dressing has a sweet/tangy flavor. What makes it fantastic, though, is the addition of buttery, toasted Ramen noodles and walnuts. Oh. My.

I'll post a picture when I can actually find my camera. =]

Sweet and Sour Salad

1 c vegetable oil
¾ c sugar
½ c red wine vinegar (or regular)
3 t soy sauce
1 c chopped walnuts
1 – 3oz pkg Ramen noodles, dry and broken into small pieces
4 T butter
1 head romaine lettuce – rinsed, dried, and chopped
1 head fresh broccoli, chopped
1 bunch green onions, chopped

Whisk together oil, sugar, vinegar, and soy sauce. Best to make a day ahead but it’s not the end of the world if you don’t. It’ll be delicious anyway.
Melt butter in a frying pan over medium heat. Add crushed ramen noodles and walnuts; toast til golden brown.
Combine the Romaine, broccoli, and green onions. Add the dressing and toss. Sprinkle with ramen mixture before serving.