Sunday, February 24, 2013

Top 10 Easter Egg Tutorials This Spring

There are so many amazingly talented people out there. 
After hours of gleaning Pinterest, blogs, and google, 
I compiled ten of my favorite Easter egg tutorials.

Yes, I know they're not all new this year. Some are just too cute to archive yet.
These are not in order of amazingness, by the way.
They are ALL knock your socks off fantastic in their own ways.

The goal with this post was to find tutorials that were not so far beyond the abilities 
of mere mortals I would never be able to reproduce 'em.

For the most part, I felt like I succeeded, 
but some of these were just so darn neat that I couldn't help 
but throw them into the mix for the daring.


Just to start you off right....baked eggs??? 
I've never tried this, but it looks like a great idea.

Wild Ink says that the eggs never crack (hate it when that happens!) 
and the yolks stay centered when they're done this way. 
Umm...smart. I'm definitely going to try this. 


These are amazing. The eggs are hollowed out, then painted with watercolors and watercolor pencils. They remind me of beautiful, fabric wrapped treasures. 

The neat part is that you don't have to be exact with the painting - the detail is all in the pencil. Check out Alisa Burke's page for details (and just keep looking!!!).


I have to brag on one more by Alisa Burke because they are so unique 
and I can't get them out of my head. 
Check out these eggs that are decorated with a Sharpie.


As a side note, I went to make breakfast and found the ones in the picture below in my fridge, courtesy of my teenage son. Teen boys should not be allowed on Pinterest. It gives 'em ideas.


I love these...I can just picture my kids erasing and drawing again and again. 
Paint eggs with calkboard paint and draw away. 
HomeMadeSimple has the tutorial on view 9 of 18.


Lil' Luna is always coming up with cute ideas. 
How about these subway art eggs made with vinyl stickers and acrylic paint? 
She used hard boiled eggs, but these turned out so nicely that 
I'd be tempted to use hollowed eggs and keep them around for a few years!


I love these beauties below from Brown Paper Packages
Each egg has been hollowed out and colorful napkins
were Mod Podged to the shell. 
The colors just say spring!


I love the colors you can get with natural dies. 
These have been colored with cabbage, onion skins, turmeric  beets, and other natural goodies. 
The Kitchn has the tutorial if you want to try a la natural.


I thought these looked simple enough for the kidlets to make. 
BrightBoldAndBeautiful posted the original link to instructions. 
Since it's no longer accessible, here's my best guess.

Submerge your egg with one side up and exposed to create the white window. 
Frame it with some simple dots of acrylic paint or sharpie marker. 
Print out a name or Eastery word, trim close to the edge of the ink, and Mod Podge it in place.
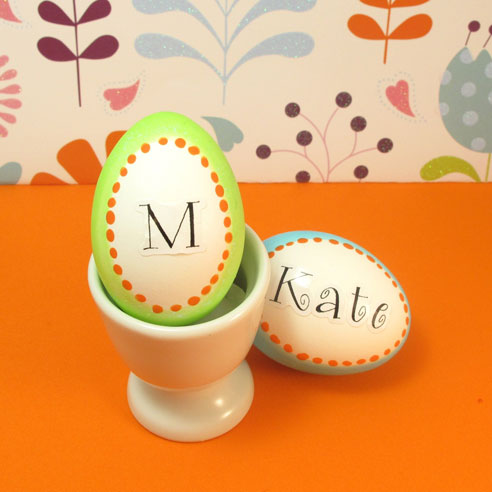

Kind of a gold leaf look. I like the effect. 
Rich, elegant, simplistic. 
Amazing what you can do with a little masking tape and gold paint! 
Check out the tutorial at So Crafty.


This woman is genius! 
She used a paper punch on contact paper! 
You could do this with whatever punch shapes you have. 
I like this one a bunch....simple. 
Now to sepatate the backs off of those little circles....

Abbie Living has the tutorial here.


Crafts by Amanda has tutorials on 7 Cool Ways to Dye Easter Eggs
These are called Chinese tea eggs, though I've seen them called dinosaur eggs on other pages. 
I STILL remember the deviled egg sandwiches my mom made 
with the shattered eggs when I was a kid.


If you're feeling really ambitious......check out the tutorial for these beauties. 
A hollowed egg gets a design made with 3-D paint, then a coat of acrylic. 
The rose is a piece of a napkin and a little Mod Podge.

The page is in Polish, but google translate works wonders, and the pictures show 
everything you need to know. Beautiful work by  Sylvia Serwin.
And while you're there, check out her cut ostrich eggs. Wow.


A tisket a tasket, I need to make this basket. 
Moda Bake Shop has the tutorial here
You know you need it for all the beautiful eggs you are going to make....


Happy Easter!!!


Monday, October 8, 2012

And I Simply Decided to be Happy Again


I was just thinking today about my decision to be happy.


My husband had passed away and I was determined that I would be one of those widows who always wore black and had the air of dignified, brokenhearted sadness about her.

Really, I was never going to smile again. Then the Big Guy would know just how much I loved him and missed him. So would the world.

Ahhh… how noble it would be to go through life and never again experience joy because of my loss.

A plastic grocery bag blew across the street in front of me and I started crying. It was pretty pathetic.

Then one day, I caught myself smiling and laughing at something.

I cried all over again, because really, was I supposed to be happy?

I decided then that this sad life was not the life I wanted. I didn't want to be a martyr. I wanted joy again. I wanted my kids to see me laughing. I wanted them to be happy.

And so I decided to be happy.

It wasn't an automatic switch.

It still took time.

I still cried when I answered the phone and someone asked for my husband.

I still cried at night when I said my prayers.

But the decision was there and happiness followed.

I am so glad that I made that decision. My big guy would have wanted me happy. 

Wednesday, September 26, 2012

Idaho Baked Potato Soup


Idaho Baked Potato Soup is one of my all time favorite soups for fall. Imagine a big baked potato smothered in butter, bacon, cheese, and sour cream. Now imagine it hot and ready on your stove all day long!
 
This soup smells wonderful and is so filling. It lasts pretty well in the fridge and heats up nicely for lunch. It's probably not a good cantidate for freezing, but we never got that far. For more family favorites, clicky here.
 
This recipe is from my sister-in-law. She's an Idaho girl. =]
 
Idaho Baked Potato Soup

½ c butter
½ c flour
7 c milk
4 lg potatoes, baked, cubed, and peeled
4 green onions, sliced
1 lb bacon, cooked and crumbled
2 c shredded cheddar cheese
1 c sour cream
1 t salt
½ t pepper

Melt butter in a large soup pot. Stir in flour. Heat and stir until smooth. Gradually add milk, stirring until thickened. If you pour it all in at once, it takes forever to heat and doesn’t seem to thicken. The dump it all together method does not save time on this one.

Add potatoes and onion. Bring to a boil, stirring constantly. Reduce heat. Simmer 10 minutes. Add remaining ingredients. Stir until cheese is melted. Makes 2 ½ quarts.

Navajo Tacos / AKA Almost Copycat Taco Bell Chalupas

Have you ever tried Taco Bell's chalupas? I know it's probably uncool, but I have to confess that I love 'em. That's why they're here in the 30 Days of Family Favorite Recipes.

These babies, Navajo Tacos, remind me of them. They're a special treat and we don't have them often, but when we do....ahhhh....bliss!

They're pretty simple to make - so simple in fact, that my kids can make them, and often do when I need to study. If your kids are young you should probably do the cooking, but my youngest has been mixing and rolling these since she was six or seven.


Navajo Tacos

3 c small uncooked red beans
1 lb lean ground beef
1 – 8 oz can tomato sauce
1 pkg chili seasoning mix
Chopped lettuce
Chopped tomato
Chopped onion
Grated cheddar cheese
Salsa or taco sauce

Soak beans in cold water for at least two hours or overnight. Drain beans and place them in a large pot with 5 cups of water. Bring to a boil, cover and cook, boiling steadily for one hour. Reduce heat and cook, covered, for two more hours. Beans are done when the skin peels back when you blow on them.
While beans are cooking, brown beef and crumble, about 20 minutes. Drain grease. Add tomato sauce and chili seasoning and simmer for an additional 10 minutes to blend flavors.
While mixture is simmering, prepare a double batch of fry bread. 
To serve, spoon bean mixture onto hot fry bread and top with any combination of lettuce, tomato, onion, cheese, and salsa.
Indian Fry Bread

5 c flour
2 T baking powder
1 T melted butter
2 t salt
2 c milk
Oil for frying

          Mix dry ingredients. Stir in milk and butter a little at a time. Mix into soft dough but do not knead. Divide into golf ball sized portions and roll to 1/4-inch thickness. 
          Heat oil to medium heat. Oil will be up to temp when a small piece of bread dough sizzles when placed in oil. Fry til golden brown. Flip and fry on other side. Drain on paper towels. These can be kept hot in a 170 degree oven til ready to serve.


Sunday, September 23, 2012

Show Your Kids How Much You Love Them

I fell off the wagon. I was going to post thirty recipes in thirty days, then life got busy and I stopped. Now it's been....awhile...and I'm almost embarrassed to come back. Aaarg.

So much for goals.

Here's a better one, at least for the moment, that I found on Amy Lynn Andrews' wonderful Facebook page.


I decided to put this one to the test.

I hugged my 13 year old daughter goodnight and didn't let go.

She hugged me back and didn't let go.

For a long time.

And then we both started giggling.

For a long time.

It made me wonder how many times I pull away first because important things need to get done - and how much my kids want to hold on just a little longer.

It's sometimes hard as a single mom, and a widow at that, to find the time to do everything (which is why my kitchen floor is still a mess, but that's another story). Yet when the day comes to an end, they are most important in my life....and they need to know it.

Try an experiment. Hug your kids tonight and wait for them to pull back first. See if they notice a difference. I think you'll be pleasantly surprised.  =]

Tuesday, September 11, 2012

The Lightest, Crispiest Waffles Ever

My kids were astounded one day to see frozen waffles in the grocery store. We've always made them. Not from a mix, mind you, and not because I'm a waffle snob. I'm cheap.

After years of making waffles from scratch, I splurged and bought a mix. Know what I discovered? Scratch is better! And the bonus? They really don't take much more time than making them with a mix.

This recipe is the one we have used for years and have always had great results. The waffles are light and crisp. Top them with a little butter, yeah, the real stuff, and drizzle them with syrup and you're good to go.

This post is one of 30 in a series of Family Favorite Recipes. To see the rest, check here.

As a mom with a wild schedule, I have been known to cook up a bunch of these at once and freeze them in Ziplock baggies.

If you decide to try this, undercook slightly so you can pop them in the toaster later without burning them to a crisp. Let them cool on a wire rack before bagging or they stick together. To reheat, the toaster is the best option I have found to retain some crispness. If you're doing a bunch, put them on a cookie sheet and stick them under the broiler. Just keep an eye on them or they'll burn.The microwave will work in a pinch and are a great option for kids, just don't expect them to be crisp this way.

Waffles

1 ¾ c flour
1 T baking soda
½ t salt
2 eggs, separated
1 ¾ c milk
½ c oil

In a large mixing bowl, stir together flour, baking powder, and salt. Set aside. In a small mixing bowl, beat egg yolks with a fork. Beat in milk and oil. Add to flour mixture all at once. Stir til blended but still slightly lumpy.

In a small mixer bowl, beat egg whites ‘til stiff peaks form. Gently fold beaten egg whites into flour/milk mixture, leaving a few fluffs of egg white. Do not over mix. The egg white is what makes your waffles light and crispy. Cook on a lightly greased waffle iron as usual.

I have used up to ½ whole wheat flour with good results.


Monday, September 10, 2012

Recipe for Disaster

Not every day is perfect. Some need serious work. The newest recipe for the month of Family Favorite Recipes is not one that I'm fond of....sorry. If I could have skipped it, I would have. Really.

Recipe for Disaster

1 busy lady running full tilt
1 handful children
8 expected dinner guests
1 messy house
1 very solid and immovable couch
1 medical insurance policy that can't be used because the deductible is through the roof

Mix all together and watch the poor lady laugh and cry on the floor while she holds her foot. Groan in sympathy as she attempts to put her dislocated pinky toe back in place (it worked) as the kids look on in fascination. Serve with sympathy and dash of compassion as she hobbles around the house for the next week.

May you never find yourself serving this meal.

~ Erin  =]